The more I learn, the more I realize how little I know.

Wednesday, December 31, 2008

DIY - Make a simple yet decorative zipper pull with paracord

Here's a simple yet decorative zipper pull you can make with paracord. It might also be used as a key or watch fob, even as a knife lanyard.

It begins as a bend (a bend joins two ropes together) called the Japanese Bend in The Ashley Book of Knots (ABOK 1423) but easily becomes a zipper pull by modifying it to use only one working end.

This is how the Japanese Bend appears in the ABOK:

But before you see how to tie it as a zipper pull, first try it as a bend so you get the hang of it. Start with two strands of cord or use the two ends of one piece. Click the picture below and start your knot, working the cord till you get it to look like the completed bend.

(By the way, don't bother to add the Japanese Bend to your arsenal of real-world, working bends - it's only worthwhile as a decoration.)

After you've got the bend figured out, try the modification for a zipper pull.

Start with the end of one long strand - you'll want to work with at least 2 feet - but it could be any length because you're not going to cut the cord until you're all done and have worked it down to the size you want.

My modification is to create the zipper pull loop by making the working end of the bottom strand (in Ashley's diagram) longer and bringing it around to use it as the other strand in the bend. See the picture below.

So that's it but it's not really necessary that you understand it. Just use the picture below to start your zipper pull and work your cord till it's the size you want. Then cut and melt the end.


I attached one to my carhartt winter coat.

Some final words:

Once you make a few of these, you'll see how simple they really are. Last night I had a 20 foot length of paracord and I made one, cut it off, then made another, cut it off... until I made the 4 pictured at the top. So there's no waste. And if you were to pull one of those apart, you'd see it was only about 11 1/2" long. So it doesn't use much cord.

Sometimes I'll make up a handful of these while I'm watching TV, carry them around and hand them out to people I meet. If you carry a piece of paracord with you, you can make one on-the-spot then give it away - it's like performing a magic trick.

I also have zipper pulls on my website HERE.

I hope you like this. Have some fun.


Friday, December 26, 2008

My knife lanyard - the one I wear most everyday


This is the belt-loop, knife lanyard I wear most everyday. It's tied with 2 colors of paracord, Kelly Green and OD Green, and it's just a series of square knots making a solomon bar with a diamond knot then a 5" long loop. It has a heavy duty clasp on one end and a wood pony bead on the other to snug down the hitch that attaches the knife.

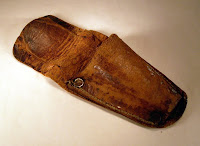
The knife I usually carry is the hawkbill I bought a few years ago to replace the hawkbill I had when I was in the Navy Seabees back in the mid-70's. Back then I carried it in this sheath.


Then about 10 or so years ago I'm out one night riding the bike around southwest Detroit but when I got back home the knife was gone - lotsa potholes and train tracks down there - and it musta just popped out. I felt bad for weeks because I had that knife for more than 20 years.

I still carried a knife after that but it wasn't a hawkbill - they're damn near impossible to find. Then a few years ago I'm out and about and I see one and grabbed it - it's got a wood handle and locking blade.

This was around the time I had started working with paracord. I bought a cheap clasp and went home to create a belt-loop lanyard so I would never lose my hawkbill again while riding the bike or working outside.

Over time I modified the design till I came up with the one I use now. I clip it above my right back pocket.


And since it's been sold to enough bikers, outdoorsmen, workmen, and tree climbers, it's been tested and I know it holds up.

The two modifications I made were using this heavy-duty clasp (that ain't comin' undone!) and increasing the loop to 5".

The longer loop lets the knife sit deep in your pocket so it won't work its way out while you're motoring down the highway (but to be extra safe, put the knife in your front pocket while on the bike).

And you can cut something about waist high without having to unclip it. I've even made the loop a bit longer for some who use it as a hand loop - they attach the clasp to a split ring that goes through their knife lanyard hole.


Wednesday, December 24, 2008

Figuring out the length of paracord for a Solomon Bar

Knowing how much paracord you'll need for a knotting project (like square knotting a solomon bar for a lanyard) can be a big help. Sometimes you'll get a clue like in The Ashley Book of Knots, for square knotting he says "The length of the cords required is generally about seven or eight times the length of the finished product."

But it turns out that's not too helpful because it's too general.

So the goal is to figure out how much paracord it takes to tie a solomon bar but also to work out some method and formula so we'll know how much cord we'll need for any project in the future.

This is a Solomon Bar which is just a series of square knots.


The formula is

Finished-length-of-solomon-bar = Starting-length-of-paracord multiplied by X or

f = s (x), where f = Finished-length-of-solomon-bar, s = Starting-length of-paracord, x = the change made by tying knots

and to find out what x is, I'll tie some knots and measure the paracord before and after.

I start with two lengths of navy blue paracord (leader lines) and two lengths of orange paracord (working lines). The starting length for each of the orange cords is 37".

I start tying my square knots.


I finished tying at 7" but it doesn't really matter. I just needed a decent sized finished-length to measure.


Since all I want is the length of the paracord used to tie the knots, I subtract the remaining orange paracord which is about 3" on each side (37" - 3" = 34").

So two strands of 34" each makes 7" of solomon bar.

With a starting length (34") and a finished length (7"), and using the formula f = s (x), we get x = f / s = 34" / 7" = 0.206 but 0.2 is good enough. We're figuring paracord not building rocket ships.
And that's it.

So let's use the formula on a real example -

Say you want a solomon bar length of 5" for a lanyard you're making...

starting-length = finished-length divided by 0.2
s = f / (0.2)
s = 5" / 0.2 = 25"

The fomula says you'll need each length of paracord to be at least 25" long.

(If you went by Ashley, you'd have set aside 35" - 40" of paracord for a 5" solomon bar instead of the 25" it actually requires.)

Try it on another real situation -

You want to know how long of a solomon bar you can tie with your 2 lengths of paracord 62" each.

finished-length = starting-length times 0.2
f = s (0.2) =
f = 62" ( 0.2) = 12.4"

The formula says you can tie about 12 1/2 inches.

But remember, we're just trying to come up with a close approximation. The x = 0.2 is a guide so always add a few inches on the end of each working line. And the 0.2 is only good for the solomon bar - each chain of knots will be different. Also, the number that comes out of the formula is for one strand so double it for total length of paracord. One more thing - your x for a solomon bar may be slightly different than mine but now you can determine your "x" for this and other knot chains. Experiment.

And since this formula is only concerned with ratios, and with all things being equal (like using the same diameter cord for all 4 strands - 2 leaders and 2 working), it should also work on any diameter cord.

Well, in theory, maybe... But will it?

Here's a solomon bar made with string -


The starting length for each working strand was 14.5" - 1" remaining on each so
f = s (0.2) = 13.5" (0.2) = 2.7" of finished solomon bar.

What does the tape measure show?

Please comment on this. Easy to understand? Too complicated? I can do more of these, if you're interested. Thanks.


Sunday, December 21, 2008

Standard vs. turk's head monkey fists

Here are three monkey fists but two of them started as turk's heads. The brown one is tied using this standard method - 3 times around creates a 1" diameter fist. The red and orange are 3 lead 5 bight turk's heads which also become 1" diameter fists. I used the photos in The Complete Book of Knots and Ropework as a guide to tie these.


I tie the standard monkey fist using a jig (made from a coat hangar) then drop a 9/16" wood ball in the center.


The turk's head I first tie around a hammer handle, then I work the slack out and slide the knot off and tighten it around a 1/2" wood ball.


I get the wood balls from my local Michaels or you can go directly to Lara's Crafts.


Saturday, December 20, 2008

Three bracelets

I got my side release buckles in the mail the other day and made some bracelets as experiments for a possible future watchband. The two on top are done with square knotting and for the bottom one I used the instruction from Stormdrane found here.


The small buckle is the 3/8" Curved Side Release, the larger one is the 5/8" Curved Side Release from Creative Designworks (I recommend - good prices and my buckles arrived a couple days sooner than I expected).

Wednesday, December 17, 2008

My new monkey fists

I recently got back into doing monkey fists. A guy emailed me about his project which was to use monkey fists as zipper pulls for his Maxpedition Jumbo Versipack. So I started doing monkey fists again. It had been a couple years or so since I worked through my last one so it took me a good length of paracord to get back in the groove.

They were fun to do but I had never sold them so I had never worked out some of the basics like - how much paracord do I start with, how much paracord makes up the finished monkey fist, what size wood ball to use in the center, should I melt the ends or use glue or both? Stuff like that.

So it took a few nights but I figured most of that out. And here's a few of the final monkey fists.


You can see more pics here.


Tuesday, December 16, 2008

Paracord Wallet Chains

I had to do some repairs on my wallet recently so I created a few different paracord sustitutes for the chain. This one is an open snake style and is about 14" long - it has 2 strands of military-spec 550 paracord, accented with 2 beads and 2 split rings. (The chain I replaced was 13" long.) I used Black and Brown for the parachute cord and light brown beads. The split rings (key rings) I used are 20mm (3/4" diameter). You can find other pictures of this here.


This one is a closed snake style and is about 12" long - it has 2 strands of military-spec 550 paracord, accented with 2 beads and 2 split rings. The chain I replaced was 13" long but because of the tight knotting it's stiff so I made this shorter. I used Black and Tan for the parachute cord and Black beads. The split rings (key rings) I used are 20mm (3/4" diameter). You can find other pictures of this here.


This one is done with square knotting and is about 9 1/2" long - it has 1 strand of military-spec 550 paracord, accented with a bead and 1 split ring. The chain I replaced was 13" long but because of the tight knotting it's stiff so I made this shorter. I used Black for the parachute cord and a Light Brown bead. The split ring (key ring) I used is 20mm (3/4" diameter).


You can find other pictures of this here. (Because this is black it's hard to see the detail of the square knotting so take a look at this pic.)


since 12/17/08