The more I learn, the more I realize how little I know.

Tuesday, January 27, 2009

I peace-tie my knife and didn't even know it

I found out what I had been doing for years with my knife was called a "peace-tie."

Spring is coming so I was looking at some bushcraft sites. I plan to do some motorcycle camping when it gets warm and I was gathering up my camping gear.

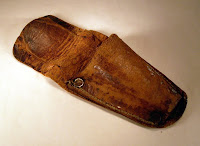
I got this knife when I was in the Navy in the mid-'70's - a USN Mark 2 made in Camillus, NY (the fighting knife which morphed into the USMC Ka-Bar). It's my camping knife.

For the longest time I didn't have a snap for the handle strap and I didn't like the way the sheath would flop around while hanging from my belt. So I added a boot lace to the sheath - I could tie it down to my leg and when I took my knife off, I would loop the boot lace around the knife guard then tie a couple half-hitches to hold it down so the knife wouldn't slide out of the sheath.


(After I tie the half-hitches, I make another turn around the handle and tuck the ends under.)

Eventually I put a snap on the sheath and replaced the boot lace with some paracord but I still tie down the knife guard out of habit. And it's a tidy way to tie off the paracord when I'm storing the knife.

So what's a peace-tie?

I was wondering if there's some cool knot used by the wild-west gunfighters to tie their holsters down so I started googling and I ran across this thread on How to Peace Tie Weapons at the RenaissanceFestival.com Forums - they'll tie a sword to it's sheath so it can't be pulled while they walk around in period garb.

And that's what I had been doing for years and I didn't know it had a name. Well, I don't actually "peace-tie" my knife but isn't it interesting the stuff you find out on your way to learning something else?

But I never did found out if there was some special way the gunfighters tied off their holsters.

(It was 16 years ago I was on a bike trip down to Florida and met some transplanted Michigan bikers and their wives who came back up every year for the renaissance festivals here and demonstrate jousting and sword fights and other such things. It might make a fun, motorcycle camping weekend for me this summer.)

Sunday, January 18, 2009

Tying the paracord star knot Part 1

I finished my first (6-point) star knot the other day.


The night before I had tried for the umpteenth time to figure out the star knot from The Ashley Book of Knots. This is the farthest I could get with a 5-point star using ABOK and some stiff, nylon clothesline.

So the next morning I went out looking and found this star knot tutorial from Dan at the Alaska Museum of Fancy Knots.

This is a fine step-by-step tutorial and is much easier to follow than any other I've seen. But there are a few things I will point out:

1. Dan's tutorial is to make a star knot as part of a tool-handle covering so if you just want to make the star knot (Diagrams 1 - 30) then you should start with paracord strands of only about 18" each - you'll probably want to make a few star knots anyway before you tackle that project. And the more knots you make, the more you can reduce your starting lengths.

2. Dan uses a self-threading needle to push his cord through the tight spots. And so did I. If you are going to be doing star knots, turk's heads and other fancy, multi-strand knots then you should get one because there is really no substitute. For now though, you could try reaching in with hemostats or some VERY thin, needle-nose pliers to pull your cord through. Or just make everything loose and push cord through as best you can - which is ok because your first couple are experiments anyway (your learning curve).

I used a Super Jumbo Perma-Lok Lacing Needle (1193-05) I got from my local Tandy Leather Factory store.

Go to the Tandy Leather Factory - and search on 1193-05 for the Super Jumbo (5" long). The 1193-02 Jumbo is described to be used for the same material but I've looked at the Jumbo and the hole is half the size of the Super Jumbo and appears much too small for paracord. If you have actual experience otherwise then please leave a comment or if you know of any other lacing needle that can be used with paracord and is shorter than 5" then please leave a comment.

And to use a lacing needle with paracord - cut the end of the paracord on an angle and use a lighter and your fingertips to make a point then twist the lacing needle around it.

I also use the tip of my lacing needle to help work knots into the right shape. The tip is blunt and won't tear the paracord's nylon covering like a scratch awl might.

3. To make a star knot, you'll be looking at Diagrams 1 - 30. Study the Diagrams. It took almost 3 hours to complete my first knot. I studied the pictures and worked the cord till it looked like the pictures - I looked ahead and also back-checked my work.

Slow down and take your time. You'll be rewarded with a nice knot and you'll reduce your overall learning curve. My second star knot took about 90 minutes to complete, my third took about 45 minutes.

4. All the stuff about leaving the loops (Diagrams 20-26) helped alot. I was able to check my work using the loops to predict cord pulls like - if I pull on this cord from below, I expect that cord above to move.

And towards the end I realized I had made an error that had continued for a few cords and by using the loops to check, I corrected that error. If I had pulled the strands tight at the start, I may have gotten to the end, saw that it didn't look quite right but wouldn't have known where the error was.

Here's my 2nd star knot - I alternate Black-White to see what it will look like.

And my for my 3rd star knot - I do 3 strands of Navy Blue then 3 strands of Red to see what pattern that will make.


I have some more stuff to say about star knots so stay tuned for a Part 2.

Well, that's it for now. Good luck and have some fun tying knots.

See ya.

Friday, January 16, 2009

Single-digit cold in Michigan


It's been single-digit cold for the last few days here in Michigan. And that means I had to get out and shovel some snow so I put on my carhartt coveralls. Here's me ready to go outside.


I've got a watchcap (with a face hole) that goes down to my neck, a face mask on top of that, then a bandana and topped off with a winter-lined watch cap. I've collected all different kinds of cold and rainy weather gear for riding the bike through all four seasons here. (And there's my photo-light set up behind me.)

I made some zipper pulls for my coveralls - a two-color monkey fist and then one with a diamond knot and some snake knots.

And since the legs zip down, I made some monkey fists that had a short loop (so they wouldn't drag) and attached permanent to the zippers.

See ya.

Friday, January 9, 2009

Secondary considerations when buying or making a paracord "survival" bracelet

I had previously discussed the two primary considerations when buying or making a paracord "survival" bracelet - whether the bracelet comes apart easily and is there a sufficent length of paracord to use in your emergency situation. But there are a few other things to consider.

How is the bracelet finished?

The way a bracelet is finished will decide the amount of useable paracord you'll have when your bracelet is unraveled. Are the ends tucked back into the design of the bracelet or are they melted and stuck to the underside? If melted, your total length of paracord will be less and may make chunks of paracord virtually unuseable.

Shackle or Buckle?


The two connectors you'll see online are the plastic, side-release buckle and the stainless-steel, anchor shackle - the shackle will be stronger, more durable and easier to use than the plastic buckle in your survival/emergency situation.

But I'll add this caution about the shackle: When I first tried making a bracelet, I looked for a side-release buckle locally and couldn't find any so I bought a 3/16" anchor shackle (from Lowes for about $2.50) to use instead. I made a "test" bracelet but found I couldn't attach it to my wrist when it was done. I couldn't slide the pin through the hole then through the looped paracord with my free hand. So I ordered some side release buckles and made some bracelets with those. Maybe it's me though (lots sell the shackle bracelets) but my fingers just won't work that way. (Try Creative Designworks for buckles.)

Should you make a bracelet or a watchband?

If you'd like to try to make one yourself, check out the tutorial by Stormdrane HERE. He shows you how to make either a bracelet or a watchband - or you might use a compass instead of a watch, or try to include both. See some watch-compass combos.

And this brings me to the last of the things you should consider.

How does your bracelet look? Is it comfortable?

These may be your most important considerations. An "ugly" uncomfortable bracelet may spend most of its life in the back of your sock drawer. A "cool lookin" comfortable bracelet however, (with half the paracord) is more likely to get worn and will be more likely on your wrist when you need it. And if you've made it as a watchband, you'll always be wearing it.

So really, there is no "best" survival bracelet - it'll come down to some trade-offs and whether you'll want to buy or make the one that's best for you.

Lastly - you've got an emergency, you take your bracelet apart and you've got a good-sized length of paracord. Now what?

Is your basic knowledge and experience with knots tying your shoelaces? Are you going to wrap cord around and around wasting a good portion of your length when a few inches with the right knot would have done the job?

Take a look through my knot-related site links, practice what you already know, experiment with some new ideas, and if there's one book you should get, it's The Ashley Book of Knots. My favorite chapter (and Ashley's largest) is Chapter 2: Occupational Knots - from The Archer to The Yachtsman, see the knots that are peculiar to each of these 80+ occupations.

And this just in - take a look at something new from Stormdrane - a Doubled Paracord Bracelet. If you're a DIYer, you'll want to experiment and try to duplicate this interesting style.

See ya. And have some fun with knots.

(This was expanded from a post I made on the Every Day Carry Forums.)

Wednesday, January 7, 2009

Making a paracord hammer loop

Some strong winds blew some siding off my house so I had to nail it all back up. Out in the garage, I dropped a handful of roofing nails in a nail apron, grabbed my hammer but couldn't find my leather, hammer loop. It's sorta like this one:

I was going up a ladder and needed both hands free and, necessity being the mother of invention, I took some clothesline, made a small bowline to hang the hammer then made a larger bowline to hang around my neck.


And it worked. My hammer was hanging right in front of me and I could get at it easily while standing on the ladder and holding a length of siding.

That evening I've got The Ashley Book of Knots in front of me and I'm thinking about making a paracord hammer loop for my belt. The basic design would be two loops, one to go around my belt and one for the hammer but I wanted to find a specific kind of loop for the hammer. I needed it to be open when there was no hammer in it, more like a circle.

I found what I was looking for in Chapter 11: Single-Loop Knots. Here's ABOK 1063:

From the diagram it looked like just what I wanted - and it was.

I cut off a 4' piece of paracord, made my loop in the center, brought the ends around and fed them through the knot, tied some square knots halfway up (to hold it together), then ran the ends down through the inside of the square knots and cut and melted the ends.


And my paracord, hammer loop has a significant advantage over the leather one. The leather loop is made to be stiff (to hold it open) but it remains stiff when the hammer is in there, so when you bend over, the hammer tends to slide and bending over far enough, the hammer falls out of the loop.

With my paracord, hammer loop, the loop stays open with no hammer - and with a hammer and bent over, the hammer handle (like a gyroscope) stays pointed to the ground and the loop twists and holds the hammer.

And I couldn't have made it the way I did without my Ashley Book of Knots.

See ya.

Friday, January 2, 2009

Primary considerations when buying or making a paracord "survival" bracelet

A survival bracelet made from paracord (parachute cord) should be constructed so that it comes apart easily and gives you a sufficient length to use in your emergency.


I'll be looking at the 3 different styles you'll most likely find somewhere online: the single-strand solomon, the double-strand solomon, and the single-strand weave. ("Solomon" refers to a solomon bar which is a series of square knots. You can also look at a previous blog article I did on the solomon bar HERE. And the weave is just going over-under-over, etc. then snugging it tight.)
I made the three bracelets for my wrist, about 7 1/4" around. But don't get hung up on the numbers. And I don't want to get too technical with all this. I'm just trying to give you something to think about.

First up is the double-strand solomon, the most popular but as you'll see, is the worst of all three styles for a survival bracelet.


Is it easy to take apart? A solomon bar (a series of square knots) is easy to undo because paracord square knotting doesn't stay tight. But each of those knots will have to be undone individually. So as you're standing there freezing, sweating or in the wind or rain, you'll be fumbling through each knot. Easy, but it'll take a few minutes.

Is there a suffficient length of cord to use? For mine, I used 2 strands of paracord about 50" each. So that's 100" but it's not really 100 because if you need that longer length you'll have to tie a "bend" to join the 2 strands together and that will reduce your total length by about 3 inches for each strand. And the reliability and strenth of that connection will be dependent on the type of bend you tie. But with any knot, it will be weaker than a single strand. So you've got a weak 94" - though that may be good enough for what you need to do.

Second, is the single-strand solomon.


It's comes apart and has about the same length as the double strand but you'll get one long piece of cord. For that reason alone, it's better in a survival situation than the double-strand. If you need two lengths, you can always cut it. You're carrying a knife, aren't you? (Though with the single-strand, you can cut it where you want. With the double-strand, you're stuck with where it's already been cut.)

Third, and I think, the best bracelet for your survival or emergency situation is the single-strand weave. I used about 115" to make mine (more paracord than either solomon) and it's one strand.


But is it easy to take apart?

Taking apart the weave, is like pulling on a loose thread... The way it's put together, it's just one pull and your bracelet (with a little help) will come apart. It's so much faster and easier than the solomons, they shouldn't even be compared to each other.

So, I believe, the weave is your best bracelet for survival.

But don't be so quick to throw out your solomon bar bracelets and jump on the Weave bandwagon till you see what else I've got to say on the subject.

I'm working on a Part 2 to look at the other things you should consider before buying or making your "survival" bracelet. Like should you get one with a buckle or a shackle?


Seems obvious? Don't be so sure.

For now though, you can check out Stormdrane's tutorial on making the weave bracelet HERE. It's what I used to make mine. I'm not really sure anyone sells a "weave" bracelet, most are the square-knotted type - Google "paracord bracelet" to find those.

And if you need to tie your two strands of paracord together, use a "bend" that won't come apart in a couple shakes (like the sheet bend). Try the far-superior Zeppelin Bend HERE.

(This was adapted from a post I made on the Every Day Carry Forums.)


Nitro-Pak Emergency Preparedness Center

Mountain House Freeze-Dried Food

Wednesday, December 31, 2008

DIY - Make a simple yet decorative zipper pull with paracord

Here's a simple yet decorative zipper pull you can make with paracord. It might also be used as a key or watch fob, even as a knife lanyard.

It begins as a bend (a bend joins two ropes together) called the Japanese Bend in The Ashley Book of Knots (ABOK 1423) but easily becomes a zipper pull by modifying it to use only one working end.

This is how the Japanese Bend appears in the ABOK:

But before you see how to tie it as a zipper pull, first try it as a bend so you get the hang of it. Start with two strands of cord or use the two ends of one piece. Click the picture below and start your knot, working the cord till you get it to look like the completed bend.

(By the way, don't bother to add the Japanese Bend to your arsenal of real-world, working bends - it's only worthwhile as a decoration.)

After you've got the bend figured out, try the modification for a zipper pull.

Start with the end of one long strand - you'll want to work with at least 2 feet - but it could be any length because you're not going to cut the cord until you're all done and have worked it down to the size you want.

My modification is to create the zipper pull loop by making the working end of the bottom strand (in Ashley's diagram) longer and bringing it around to use it as the other strand in the bend. See the picture below.

So that's it but it's not really necessary that you understand it. Just use the picture below to start your zipper pull and work your cord till it's the size you want. Then cut and melt the end.


I attached one to my carhartt winter coat.

Some final words:

Once you make a few of these, you'll see how simple they really are. Last night I had a 20 foot length of paracord and I made one, cut it off, then made another, cut it off... until I made the 4 pictured at the top. So there's no waste. And if you were to pull one of those apart, you'd see it was only about 11 1/2" long. So it doesn't use much cord.

Sometimes I'll make up a handful of these while I'm watching TV, carry them around and hand them out to people I meet. If you carry a piece of paracord with you, you can make one on-the-spot then give it away - it's like performing a magic trick.

I also have zipper pulls on my website HERE.

I hope you like this. Have some fun.


Friday, December 26, 2008

My knife lanyard - the one I wear most everyday


This is the belt-loop, knife lanyard I wear most everyday. It's tied with 2 colors of paracord, Kelly Green and OD Green, and it's just a series of square knots making a solomon bar with a diamond knot then a 5" long loop. It has a heavy duty clasp on one end and a wood pony bead on the other to snug down the hitch that attaches the knife.

The knife I usually carry is the hawkbill I bought a few years ago to replace the hawkbill I had when I was in the Navy Seabees back in the mid-70's. Back then I carried it in this sheath.


Then about 10 or so years ago I'm out one night riding the bike around southwest Detroit but when I got back home the knife was gone - lotsa potholes and train tracks down there - and it musta just popped out. I felt bad for weeks because I had that knife for more than 20 years.

I still carried a knife after that but it wasn't a hawkbill - they're damn near impossible to find. Then a few years ago I'm out and about and I see one and grabbed it - it's got a wood handle and locking blade.

This was around the time I had started working with paracord. I bought a cheap clasp and went home to create a belt-loop lanyard so I would never lose my hawkbill again while riding the bike or working outside.

Over time I modified the design till I came up with the one I use now. I clip it above my right back pocket.


And since it's been sold to enough bikers, outdoorsmen, workmen, and tree climbers, it's been tested and I know it holds up.

The two modifications I made were using this heavy-duty clasp (that ain't comin' undone!) and increasing the loop to 5".

The longer loop lets the knife sit deep in your pocket so it won't work its way out while you're motoring down the highway (but to be extra safe, put the knife in your front pocket while on the bike).

And you can cut something about waist high without having to unclip it. I've even made the loop a bit longer for some who use it as a hand loop - they attach the clasp to a split ring that goes through their knife lanyard hole.


Wednesday, December 24, 2008

Figuring out the length of paracord for a Solomon Bar

Knowing how much paracord you'll need for a knotting project (like square knotting a solomon bar for a lanyard) can be a big help. Sometimes you'll get a clue like in The Ashley Book of Knots, for square knotting he says "The length of the cords required is generally about seven or eight times the length of the finished product."

But it turns out that's not too helpful because it's too general.

So the goal is to figure out how much paracord it takes to tie a solomon bar but also to work out some method and formula so we'll know how much cord we'll need for any project in the future.

This is a Solomon Bar which is just a series of square knots.


The formula is

Finished-length-of-solomon-bar = Starting-length-of-paracord multiplied by X or

f = s (x), where f = Finished-length-of-solomon-bar, s = Starting-length of-paracord, x = the change made by tying knots

and to find out what x is, I'll tie some knots and measure the paracord before and after.

I start with two lengths of navy blue paracord (leader lines) and two lengths of orange paracord (working lines). The starting length for each of the orange cords is 37".

I start tying my square knots.


I finished tying at 7" but it doesn't really matter. I just needed a decent sized finished-length to measure.


Since all I want is the length of the paracord used to tie the knots, I subtract the remaining orange paracord which is about 3" on each side (37" - 3" = 34").

So two strands of 34" each makes 7" of solomon bar.

With a starting length (34") and a finished length (7"), and using the formula f = s (x), we get x = f / s = 34" / 7" = 0.206 but 0.2 is good enough. We're figuring paracord not building rocket ships.
And that's it.

So let's use the formula on a real example -

Say you want a solomon bar length of 5" for a lanyard you're making...

starting-length = finished-length divided by 0.2
s = f / (0.2)
s = 5" / 0.2 = 25"

The fomula says you'll need each length of paracord to be at least 25" long.

(If you went by Ashley, you'd have set aside 35" - 40" of paracord for a 5" solomon bar instead of the 25" it actually requires.)

Try it on another real situation -

You want to know how long of a solomon bar you can tie with your 2 lengths of paracord 62" each.

finished-length = starting-length times 0.2
f = s (0.2) =
f = 62" ( 0.2) = 12.4"

The formula says you can tie about 12 1/2 inches.

But remember, we're just trying to come up with a close approximation. The x = 0.2 is a guide so always add a few inches on the end of each working line. And the 0.2 is only good for the solomon bar - each chain of knots will be different. Also, the number that comes out of the formula is for one strand so double it for total length of paracord. One more thing - your x for a solomon bar may be slightly different than mine but now you can determine your "x" for this and other knot chains. Experiment.

And since this formula is only concerned with ratios, and with all things being equal (like using the same diameter cord for all 4 strands - 2 leaders and 2 working), it should also work on any diameter cord.

Well, in theory, maybe... But will it?

Here's a solomon bar made with string -


The starting length for each working strand was 14.5" - 1" remaining on each so
f = s (0.2) = 13.5" (0.2) = 2.7" of finished solomon bar.

What does the tape measure show?

Please comment on this. Easy to understand? Too complicated? I can do more of these, if you're interested. Thanks.


Sunday, December 21, 2008

Standard vs. turk's head monkey fists

Here are three monkey fists but two of them started as turk's heads. The brown one is tied using this standard method - 3 times around creates a 1" diameter fist. The red and orange are 3 lead 5 bight turk's heads which also become 1" diameter fists. I used the photos in The Complete Book of Knots and Ropework as a guide to tie these.


I tie the standard monkey fist using a jig (made from a coat hangar) then drop a 9/16" wood ball in the center.


The turk's head I first tie around a hammer handle, then I work the slack out and slide the knot off and tighten it around a 1/2" wood ball.


I get the wood balls from my local Michaels or you can go directly to Lara's Crafts.


Saturday, December 20, 2008

Three bracelets

I got my side release buckles in the mail the other day and made some bracelets as experiments for a possible future watchband. The two on top are done with square knotting and for the bottom one I used the instruction from Stormdrane found here.


The small buckle is the 3/8" Curved Side Release, the larger one is the 5/8" Curved Side Release from Creative Designworks (I recommend - good prices and my buckles arrived a couple days sooner than I expected).

since 12/17/08